Integrate video into your recruitment solution and enhance the decision making process for employers.
Integrating the widget (5 mins)
Automatic Mode
It is as simple as these 2 steps :
- Add
<div>to your HTML with the IDmyinterview-widgetin the location you would like to add the button. - Call our JS widget at the end of the page and initialize it with the parameters
<body>

  <!-- Your form -->
  <form>
    ...
    <div id="myinterview-widget" style="opacity:0"></div>
    ...

  </form>
  <!-- End of the application form -->

  <!-- Scripts -->
  <script async defer src="https://embed.myinterview.com/widget/2.38.0/widget.js"></script>
</body>
Custom Mode
If you want more control, you can choose the element that will contain the button and the moment to initialise it. You need to:
- Load our JS widget
- Once it's loaded (we recommend not using async and defer in this case) call the
initfunction with the right parameters.
<body>

  <!-- Your form -->
  <form>
    ...
    <div id="mycustom-container" style="opacity:0"></div>
    ...

  </form>
  <!-- End of the application form -->

  <!-- Scripts -->
  <script src="https://embed.myinterview.com/widget/2.38.0/widget.js"></script>
  <script>
    var myInterviewRecorder = new myInterviewWidget({
      container: '#mycustom-container', // querySelector to the element that will contain the widget
      config : {
        ... // Put relevant config here (see next part)
      }
    });
  </script>
</body>
The init function takes 2 parameters:
- container: the selector where you want to put the recorder button, it uses CSS selector syntax, exactly like querySelector
- config: the object that contains all custom parameters (see Customisation part)
Attention
Chrome requires webRTC to be served over secure origins. Please ensure that HTTPS is enabled on the integration site. Please note you can still test it locally using file:/// protocol or localhost.
For more information click here.
Multiple recorder
If you need to implement multiple recorder on a single page, you can initialize recorders (has seen previously) with their own container and config.
For each new recorder, you need to increment the number n in the querySelector of the container #mycustom-container-n
            <body>
    <div id="mycustom-container" style="opacity:0"></div>
    <div id="mycustom-container-2" style="opacity:0"></div>
    <div id="mycustom-container-3" style="opacity:0"></div>


  <!-- Scripts -->
  <script src="https://embed.myinterview.com/widget/2.38.0/widget.js"></script>
  <script>
    var myInterviewRecorder, myInterviewRecorder2, myInterviewRecorder3;
    myInterviewRecorder = new myInterviewWidget({
      container: '#mycustom-container', // querySelector to the element that will contain the widget
      config : {
        ... // Put relevant config here (see next part)
      }
    });
    myInterviewRecorder2 = new myInterviewWidget({
        container: '#custom-container-2', // querySelector to the element that will contain the 2nd widget
        config : {
            ... // Put relevant config here
        }
    });
    myInterviewRecorder3 = new myInterviewWidget({
        container: '#custom-container-3', // querySelector to the element that will contain the 3rd widget
        config : {
            ... // Put relevant config here
        }
    })
  </script>
</body>
Open and Close the popup programmatically
Starting with version 2.16.0, you can now open and close popup programmatically
In this example, the popup is automatically opened after 1 second
<body>

  <!-- Your form -->
  <form>
    ...
    <div id="mycustom-container" style="opacity:0"></div>
    ...

  </form>
  <!-- End of the application form -->

  <!-- Scripts -->
  <script src="https://embed.myinterview.com/widget/2.38.0/widget.js"></script>
  <script>
    var myInterviewRecorder = new myInterviewWidget({
      container: '#mycustom-container', // querySelector to the element that will contain the widget
      config : {
        ... // Put relevant config here (see next part)
      }
    });
    // Open popup after 1s
    window.setTimeout(function(){
      myInterviewRecorder.openPopup();
    }, 1000)
  </script>
</body>- To open the popup use the
openPopup()function - To close the popup use the
closePopup()function
Reset function
Starting with version 2.21.0, you can reset the recorder, when needed using the reset function.
In this example we reset the recorder on the complete callback:
<body>
<!-- Your form -->
<form>
    ...
    <div id="mycustom-container" style="opacity:0"></div>
    ...
</form>
<!-- End of the application form -->

<!-- Scripts -->
<script src="https://embed.myinterview.com/widget/2.38.0/widget.js"></script>
<script>
    var myInterviewRecorder = new myInterviewWidget({
        container: '#mycustom-container', // querySelector to the element that will contain the widget
        config : {
            apiKey: "qDp2egprFa",
            completeCallback: function () {
                window.setTimeout(myInterviewRecorder.reset, 1000)
            },
        }
    });
</script>
</body>Customisation(15 mins)
Customise the look and feel of the widget to perfectly match your requirement
Widget Mode
- Standard mode: candidates can see the questions before they answer them and they press record whenever they are ready.
- Interview mode: questions are hidden, when candidates click Start Recording, they have 30 seconds to prepare the question before it automatically records. They can also skip the waiting time if ready to answer immediately.
hideQuestions: true to the config object.Widget Parameters

Choose your button design
Copy this code and replace the apiKey parameter with your own API Key
 <script>
      myInterviewConfig = {
          apiKey: "qDp2egprFa",
          button: {
              color: "blue",
              size: "mid",
              text: "Apply with Video"
          },
          overlay: "",
          hideQuestions: false
      };
  </script>
Custom Countdown
When the questions are in hidden mode, you can use customise the countdown duration using the countDownTime parameter (number, default 30).
Here is a code example:
<script>
  myInterviewConfig = {
      apiKey: "qDp2egprFa",
      hideQuestions: true,
      countDownTime: 40
  };
</script>
Custom Questions
If you want to use your own questions you can fully customize it.
You need to create a parts array inside the config and put the right parameters inside.
Here is an example with 2 questions :
<script>
myInterviewConfig = {
apiKey: "qDp2egprFa",
parts : [
//Complete example
{
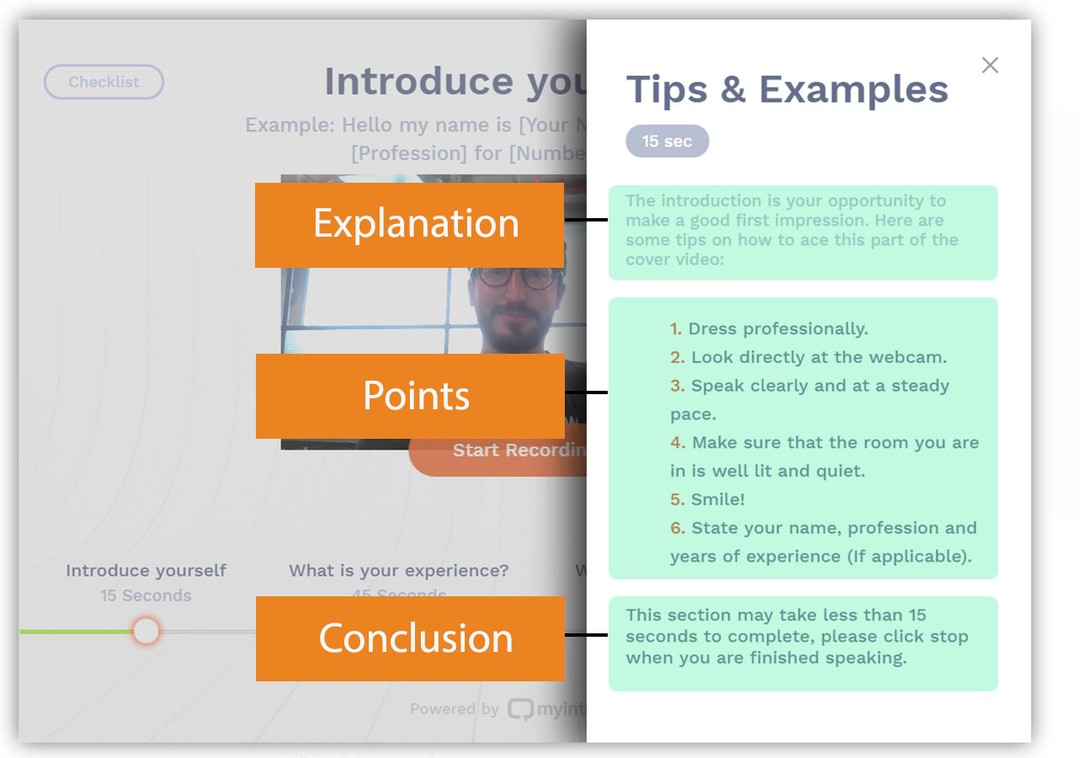
question: 'Introduce yourself', // the question of this part of the interview
partDuration: 15, // the duration of this part of the interview in seconds
description: 'Example: Hello my name is [Your Name] and have been a [Profession] for [Number of] years.)' , // the description of this part of the interview
explanation: 'The introduction is your opportunity to make a good first impression. ' +
'Here are some tips on how to ace this part of the cover video:',
points: ['Dress professionally.','Look directly at the webcam.', 'Speak clearly and at a steady pace.',
'Make sure that the room you are in is well lit and quiet.', 'Smile!',
'State your name, profession and years of experience (If applicable).'],
conclusion: 'This section may take less than 15 seconds to complete, please click ' +
'stop when you are finished speaking.',
numOfRetakes: 1 // the number of retakes the user may take for a single part
},
//Minimal example
{
question: 'What do you want to learn from your next experience?',
},
]
};
</script>
Parameters of a part
- question (required): Text of the question
- partDuration: Limit the time to answer the question in seconds (default 30)
- numOfRetakes: Number of attempts to retry the question (default 2). For unlimited use -1
- description: Subtitle displayed below the question
- explanation: When completed, you have an ⓘ icon next to the question that opens a panel on the right with additional help for the user
- points: Numbered list to assist candidates in the right panel
- conclusion: Paragraph after the listed points
Understanding tips panel
For a better understanding of the last 3 parameters, you can check this visual reference.
Remember that any of these 3 parameters are optional so you can choose the combination that suits you best.
If none of these are completed, no ⓘ icon will appear next to the question.
Custom Button
If you want to implement your own button, we have a parameter that allows you to use your own HTML code : the customBtn parameter
Here is how it works :
- It needs to be wrapped inside a <a> tag with attribute href="#video-interview"
- In case, you want to update the wording during the process (e.g. changing the text of the button to Resume Recording when user closes the popup before the end), this <a> tag needs to have the id open-popup-myinterview
- For the hash part of the URL to remain unchanged, you need to add the
data-cssmodal-nohashattribute to the button - You are free to put any HTML code inside the <a> tag
- When the user submits the video, it adds the
completedclass to the button
Here is a code example:
 <script>
      myInterviewConfig = {
          apiKey: "qDp2egprFa",
          customBtn: "<a href='#video-interview' id='open-popup-myinterview' data-cssmodal-nohash class='mycustomBtn'>Record Video</a>"
      };
  </script>
Custom Welcome Screen
If you want to use your own wording for the first screen of the popup, we added 3 parameters for you to do so:
- firstScreenTitle: string. This parameter will be the wording for the title
- firstScreenSubOne: string. This parameter will be the wording for the first subtitle
- firstScreenSubTwo: string. This parameter will be the wording for the second subtitle
All 3 parameters are optional. For a better understanding of those 3 parameters, you can check this visual reference.
Here is a code example:
 <script>
      myInterviewConfig = {
          apiKey: "qDp2egprFa",
          firstScreenTitle: "This will be the title",
          firstScreenSubOne: "This will be the first subtitle",
          firstScreenSubTwo: "This will be the second subtitle",
      };
  </script>
Language of the Interface
By default, the widget is in English. If you wish to use another language, you can use thelanguage parameter inside the myInterviewConfig. Current supported languages are as followed:
- Spanish: 'es'
- Portuguese: 'pt'
- French: 'fr'
- German: 'de'
- Hebrew: 'he'
- Korean: 'ko'
Here is a code example:
 <script>
      myInterviewConfig = {
          apiKey: "qDp2egprFa",
          language: "es" // in this example the videos will be in Spanish.
      };
  </script>
Custom User Information
Passing the user information can help you retrieve user videos at a later stage. In order to do so we give you 2 possibilities:
-
Adding
userparameter to myInterviewConfig.It can include these parameters:
- username: string. The candidate's name.
- email: string. The candidate's email.
Here is a code example:
<script> myInterviewConfig = { apiKey: "qDp2egprFa", user: { username: "candidate's username", email: "candidate's email" } }; </script> - Or calling this public function
passUserInfos(email, username). It will pass the user information to the widget in order to save the candidate's information (needs to be done before the candidate finishes the process).
Important
It is important to add user information so that our platform can track videos in the event of bugs or upload issues. Without this information, we are unable to identify candidate videos on our end to address technical issues. It will also appear clearer on your myInterview dashboard, because you will be able to search videos by candidate name.Custom Colors
Allows you to customise the colours of the buttons/elements inside the widget. In order to do so please add the overlay parameter to the myInterviewConfig. Its value is the Hex colour code as a string (e.g. "#66cccc", "#87c0ec", etc.)
Here is a code example:
 <script>
      myInterviewConfig = {
          apiKey: "qDp2egprFa",
          overlay: "#77a1e5"
      };
  </script>
Debug Mode
If you need more verbose output when integrating it, you can use the debug parameter.
Here is a code example:
 <script>
      myInterviewConfig = {
          apiKey: "qDp2egprFa",
          debug: true // activate the verbose mode (default: false)
      };
  </script>
Complete Callback Function
At the end of the recording process when the pop-up closes, a callback function can be invoked using completeCallback parameter. This is useful if you want to customise the behaviour when the user returns to your page. It is executed in the scope of your page, so you can use your own functions. It takes one parameter :
- videoID: string. The index generated for this interview (see Saving the video for more info).
Here is a code example:
 <script>
      myInterviewConfig = {
          apiKey: "qDp2egprFa",
          completeCallback: function(videoID){
            console.log('Finished recording with id: '+ videoID);
          },
      };
  </script>
Popup Callbacks Functions
If you want to execute custom functions when the popup is opened or closed, you can use popupOpened and popupClosed
Here is a code example:
 <script>
      myInterviewConfig = {
          apiKey: "qDp2egprFa",
          popupOpened: function(){
            console.log('Opening popup');
          },
          popupClosed: function(){
            console.log('Closing popup');
          },
      };
  </script>
Show Number Of Applicants
To increase the conversion you can display a "popup" inside the widget, to push candidates to apply. It appears as soon as the user opens the widget. Here is how it looks :
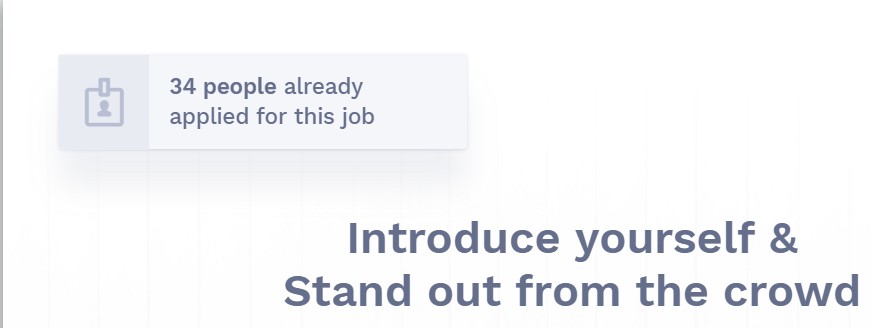
To activate it, use the showNbApplicants parameter (boolean, default false), like this :
 <script>
      myInterviewConfig = {
          apiKey: "qDp2egprFa",
          showNbApplicants: true
      };
</script>
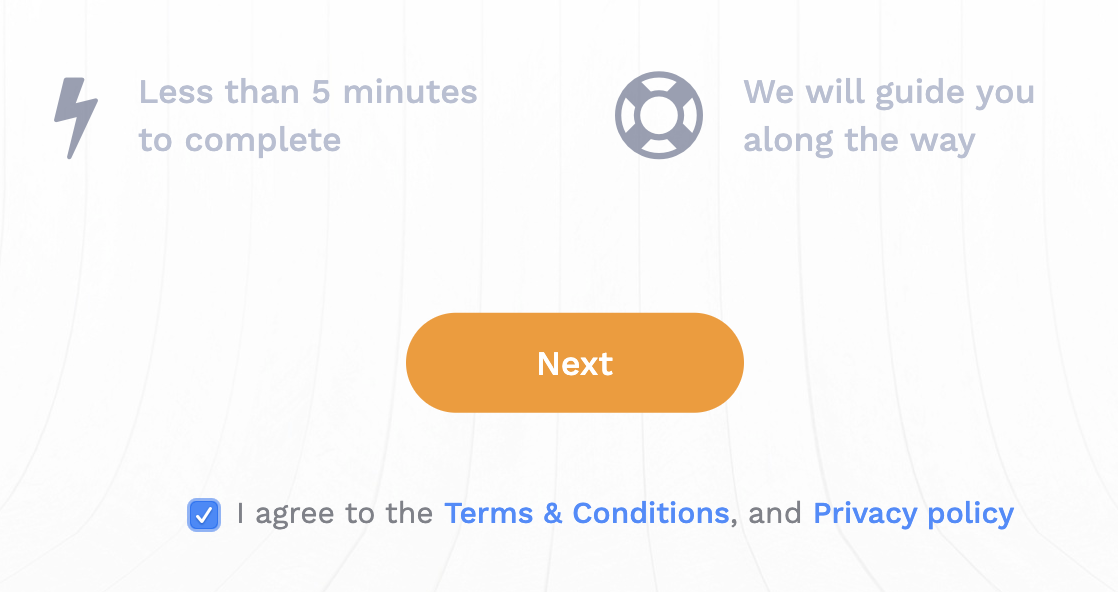
Setup Screen
Prior to the recording process, we provide an option that enables the candidate to test the internet connection and audio/video devices.
The setup screen works as follows :
- Connection test: Test the internet speed of the device, and display the result to the candidate (see below).
- Audio/Video test: Enables the candidate to record 5 seconds video and check the sound and video quality. In case we detect no sound we allow the user to switch to another microphone.

To activate it, use the optional setup parameter (boolean, default false), like this :
 <script>
      myInterviewConfig = {
          apiKey: "qDp2egprFa",
          setup: true
            };
</script>
You can also desactivate the webcam test from the setup screen, using the disableWebcamTest parameter (boolean, default false), and then it will only test the speed connection, like this :
 <script>
      myInterviewConfig = {
            apiKey: "qDp2egprFa",
            setup: true,
            disableWebcamTest: true
            };
</script>
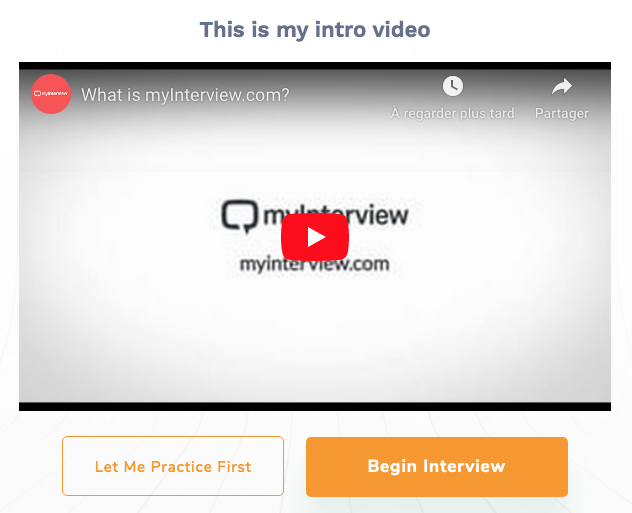
Practice Screen
Prior to the recording process, we provide an option that enables the candidate to mimic the real interview and help him/her feel more comfortable. If the option is activated, a button will be added to the first screen. The candidate can decide whether he/she wants to practice first or start the interview.

- The candidate is presented with 2 default open questions.
- Each question is 30 seconds long.
- The candidate will be able to retake each question 10 times.
- Finishing the Practice is not mandatory. The candidate can skip at anytime to the real interview.

To activate it, use the optional practice parameter (boolean, default false), like this :
Click here to see a demo.<script> myInterviewConfig = { apiKey: "qDp2egprFa", practice: true }; </script>
Custom Practice Questions
If you want to use your own questions on the practice section you can fully customize it.
You need to create a practiceParts array inside the config and put the right parameters inside.
Here is an example with 2 practice questions :
 <script>
      myInterviewConfig = {
          apiKey: "qDp2egprFa",
          practice: true,
          practiceParts : [
            {
                question: 'Introduce yourself', // the question of this part of the interview
                partDuration: 15, // the duration of this part of the interview in seconds
                description: 'Example: Hello my name is [Your Name] and have been a [Profession] for [Number of] years.)' , // the description of this part of the interview
                explanation: 'The introduction is your opportunity to make a good first impression. ' +
                             'Here are some tips on how to ace this part of the cover video:',
                points: ['Dress professionally.','Look directly at the webcam.', 'Speak clearly and at a steady pace.',
                         'Make sure that the room you are in is well lit and quiet.', 'Smile!',
                          'State your name, profession and years of experience (If applicable).'],
                conclusion: 'This section may take less than 15 seconds to complete, please click ' +
                            'stop when you are finished speaking.',
                numOfRetakes: 10 // the number of retakes the user may take for a single part
            },
            //Minimal example
            {
                question: 'What do you want to learn from your next experience?',
            },
          ]
      };
  </script>
GDPR regulation
Prior to the video recording process, we provide an option that enable to get candidate's consent regarding his personal data according to the GDPR regulation. If this option is activated, the candidate can not pursue the interview before he checks the checkbox
To activate this option, use the hasGdpr parameter (boolean, default false), like this :
 <script>
      myInterviewConfig = {
          apiKey: "qDp2egprFa",
          hasGdpr: true
        };
</script>
Terms and Privacy policy
Prior to the video recording process, we provide an option that enable to get candidate's consent on Terms & Conditions and Privacy policy.
By default links will redirect to the myInterview Terms & conditions and Privacy policy. We provide an option to customise these links and redirect to your own pages.

To customise these links, use the privacyUrl and termsUrl parameter (string), like this :
<script>
      myInterviewConfig = {
            apiKey: "qDp2egprFa",
            privacyUrl: 'your-privacy-policy-link',
            termsUrl: 'your-terms-and-conditions-link'
        };
</script>
Introduction Video
Prior to the video recording process, we provide an option that enable to add a video introduction to your interview.
To activate this option we need to activate the introVideo and introVideoTitle parameter (string). introVideo can be a Youtube, Vimeo or Dropbox link.
Here is a code example:
<script>
      myInterviewConfig = {
            apiKey: "qDp2egprFa",
            introVideo: "https://youtu.be/-hncwh7PUv8",
            introVideoTitle: "This is my intro video",
        };
</script>
Data Regionalisation
In order to be compliant with different regulations (e.g GDPR) we store candidates data according to their IP location, in 3 different regions: EU, US and AP.
If you need to store the candidates data in a specific region you can use the region parameter (string, possible values 'eu', 'us' or 'au')
Here is a code example:
<script>
      myInterviewConfig = {
            apiKey: "qDp2egprFa",
            region: "eu",       // different values can be 'eu', 'us' and 'au'
        };
</script>
Saving the video (20 mins)
All our videos are uploaded to Amazon Cloudfront, to ensure maximum performance
You need to modify your backend slightly to save the new field, that contains the id of the video.
The process is as followed :
- When a user saves a video, we generate a random identifier on our side, of 36 characters (both letters and figures), to make it impossible to guess
- Using the postMessage API, we pass this id to a hidden field:
<input type="hidden" name="myinterview-video" id="myinterview-videoId" /> - You save this id on your database to use it during the playback (the field will be inside the
<form>, if you placed the button inside it, since we append it after the button)
You have 2 steps to implement :
- You need to create a new field in your database that is a
VARCHAR(36)to save those ids. - You need to modify the function that saves the form data in the database to add the value of the hidden field.
Play the Videos (15 mins)
You can implement the function that will retrieve the URL of the video securely in various server-side languages. The idea is to generate a unique hash using BCrypt, with a combination of API Key, API Secret Token and a timestamp.
To ensure a great level of security, the hash is valid between 5 minutes before to 10 minutes after its generation (we leave an interval to match for the difference that might exist between server times, but please make sure to synchronize it with NTP following these instructions)
.NET
We recommend using BCrypt.NET library (NuGet Package) to implement the algorithm
string apiKey = "xxx-YourAPIkey-xxx";
string secretToken = "xxYourSecretTokenxx";
Int32 timestamp  = (Int32)(DateTime.UtcNow - new DateTime(1970, 1, 1)).TotalSeconds;
string apiSecret = apiKey" + secretToken + timestamp;
hashKey = BCrypt.Net.BCrypt.HashPassword(apiSecret, 10);
PHP
PHP >= 5.5 has built-in BCrypt library
<?php
$timestamp = gmdate('U');
$apiSecret = "YOUR API KEY" . "YOUR API TOKEN HERE" . $timestamp;
$hashKey = password_hash($apiSecret, PASSWORD_DEFAULT);
NodeJS
There are a few BCrypt libraries in npm as well, and we personally recommend the use of bcryptjs. You can install this through npm by running npm install bcryptjs --save from your project’s root directory.
Here’s an example of how to use it in code.
var bcrypt = require('bcryptjs');

var timestamp = Math.floor(Date.now() / 1000);
var apiSecret = "YOUR API KEY" + "YOUR API TOKEN HERE" + timestamp;
var hash = bcrypt.hashSync(apiSecret, 10);
Python
There is only one major BCrypt library for Python. Install it by running pip install bcrypt.
Here’s how to use it in your code.
# first, import it
import bcrypt
import time

# seconds since GMT Epoch
timestamp = str(int(time.time()))
# hash and save the result
hashKey = bcrypt.hashpw(apiKey + secret + timestamp, bcrypt.gensalt(10))
Embed the Videos (5 mins)
Iframe Embed (Recommended)
The simplest option to embed the video is to use our iframe.
You need to use the hashed key generated in the last step, here is an example :
<iframe
src="https://embed.myinterview.com/player.v4.html?apiKey=myApiKey&hashTimestamp=timestamp&hash=calculatedHash&video=videoId&autoplay=0&fs=0"
frameborder="0" allowfullscreen webkitallowfullscreen mozallowfullscreen oallowfullscreen msallowfullscreen></iframe>
Parameters
- apiKey (required): Your API Key
- hashTimestamp (required): Timestamp in seconds used to calculate the hash key
- hash (required): Calculated hash
- video (required): The id of the video you want to embed
- autoplay (optional): If set to 1, starts to play the video immediately when loading the player
- fs (optional): If set to 0, disables fullscreen button
Size of the video
Setting the size of the video is easy, just set the size the iframe either with width and height attributes or using CSS.
To simplify integration we provide you with this tool to help you determine the best size for your videos.
Technical considerations
Caching and Updates
All our assets (JS, CSS, images) are hosted on Amazon Cloudfront CDN, to ensure maximum performance.
Since CDN cache is persistent until unvalidated, and also to prevent client-side caching, we version everything using folders.
For example, when we transition from version 2.38.0 to version 2.39.0, you just have to change the address of the script widget from https://embed.myinterview.com/widget/2.38.0/widget.js to https://embed.myinterview.com/widget/2.39.0/widget.js
We will send an e-mail to inform you of the changes made between the 2 revisions. Please note that our usual release cycle is every 10 to 12 weeks, so that we keep constantly improving our product.
Compatibility
Our product is tested to work on :
- Windows : Chrome >= 64.0 , Firefox >= 60.0, Edge >= 79.0
- Mac OS X : Chrome >= 64.0 , Firefox >= 60.0, Safari >= 14.1
- Android : Chrome >= 64.0, Samsung Internet >= 6.2 on Android version >= 5.0
- iOS : Chrome and Safari on iOS version >= 14.3